
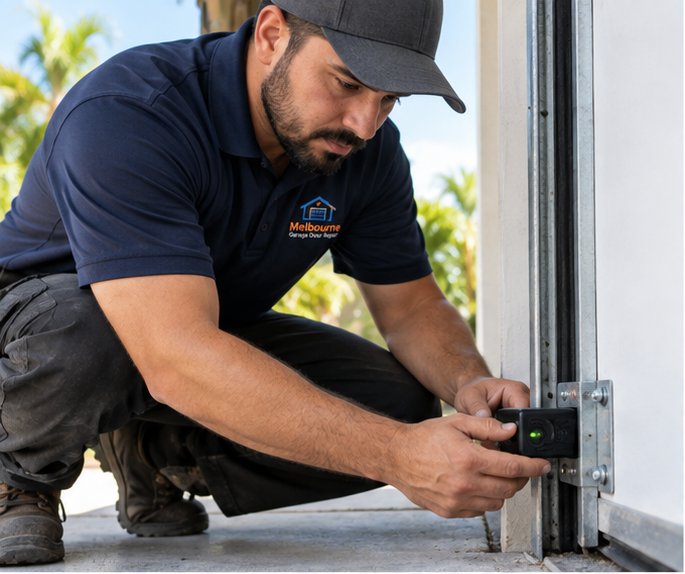
What the sensors are and why they exist
Garage door safety sensors, often called photo eyes, are a pair of small devices mounted near the bottom of the door opening, one on each side. Together they create an invisible line across the doorway. If something breaks that line while the door is closing, the opener stops the door and sends it back up.
They exist because a closing garage door is heavy and a person, a child, a pet or a car bumper can end up beneath it. Reversing on contact alone is not enough, since by the time the door touches something, the damage may already be done. The sensors detect an obstruction before the door reaches it.
Openers made in recent decades are required to include this kind of system, and most also include a second protection that reverses the door if it meets resistance. The two work together, but the sensors are the first line of defense, and the part most often noticed in daily life, usually because of a blinking light or a door that refuses to close.
How a photo eye pair works
The two sensors have different jobs. One is the sender. It emits a narrow beam of light, usually infrared, which the human eye cannot see. The other is the receiver. It looks for that beam and reports to the opener whether it is arriving.
As long as the receiver sees the beam, the opener treats the doorway as clear and allows the door to close. If the beam is interrupted, even briefly, the opener treats it as an obstruction. If the door is closing, it stops and reverses. If the door is open, it may refuse to start closing at all.
The sensors are wired to the opener with thin, low voltage wire that runs along the wall and up to the motor unit. They do not control the door directly. They send a simple signal to the opener, which makes the decision. This is why a problem with the sensors can look like a problem with the opener, even when the opener itself is fine.
Why the beam is invisible
Infrared light sits just beyond the visible range, so you will not see the beam, even though it is crossing the doorway. Sunlight contains infrared too, which is one reason direct sun on a sensor can sometimes cause trouble.
Why both sensors have lights
Each sensor has a small indicator light that reports its state. The lights are the simplest way to see whether the pair is communicating. A steady light on both usually means the beam is arriving, while a dark or blinking light on either one points to a problem with the beam.
Where the sensors belong
Sensors are mounted close to the floor, typically a few inches above it, on opposite sides of the door opening. The low placement is deliberate. It means the beam sits at the height where a small child, a pet or a bumper would break it, and it lets the sensors detect something before the door is near it.
Both sensors should be at the same height and should face each other directly across the opening. They are usually attached to the door track or to the wall beside it using small brackets. The lenses should point straight at one another, with nothing in between.
If a sensor has been moved to a higher position, the system may fail to detect a low obstruction. If a bracket is loose, the sensor can drift out of line over time. If a sensor is placed in a spot where direct sunlight lands on the receiver, it can lose the beam during certain hours of the day.
- Both sensors close to the floor, at the same height.
- Both facing each other, lenses clear and unobstructed.
- Brackets firm, with no wobble when touched lightly.
- Wires neatly secured and not pinched in the track or under a bracket.
- No direct sunlight shining into the receiver lens.
Reading the sensor lights
Most photo eyes have a small light on each unit. The exact colors and meanings differ among models, so your manual is the final authority. In general terms, however, the pattern is the same: a steady light shows a healthy connection, and anything else asks for a look.
A steady light on both sensors usually means they are aligned and powered. A dark light on one sensor and a steady light on the other often means one has lost power or its wire has been interrupted. A blinking light on one or both often means the beam is blocked or the sensors have drifted out of alignment.
If you want a closer look at what the lights across the opener, the wall control and the sensors tend to mean, understanding opener indicator lights goes through them in general terms. For the specific symptom of a blinking sensor light, see sensor lights blinking.
What commonly breaks the beam
The most common cause of a sensor problem is not a failed device at all. It is something ordinary in the way. A bag of garbage waiting by the door, a bicycle wheel, a garden hose, a pet bowl, a mop handle or a stray piece of cardboard can all cross the beam.
Dirt is the next suspect. Dust, pollen, spider webs and a film of salt or humidity can build up on a lens until the beam is too weak to register. In a warm, humid, coastal area, this happens more often than most people expect. Spiders, in particular, like the warmth and shelter of a sensor housing.
A physical bump is the third cause. A car backing in, a lawn mower, a ladder or a child with a ball can nudge a sensor just enough to lose the beam. The sensor does not look broken, but its lens now points at the wall instead of its partner.
Sunlight and glare
Sometimes a sensor works perfectly all day except for an hour at sunrise or sunset. That pattern points to direct sun entering the receiver lens. A small shade or a slight change in the position of the sensor, done as the manual describes, can sometimes help.
Wiring and connections
A pinched or loose wire can cause the lights to flicker or go dark, particularly when the door is moving. Vibration from the door can slowly loosen a connection at a terminal. This is a case where careful observation helps: note whether the light changes as the door moves.
How to clean the lenses safely
Cleaning is the single most useful thing a homeowner can do for the sensors, and it carries almost no risk. Choose a time when the door is fully open or fully closed and nobody is in the path. Use a soft, dry cloth, such as a clean microfiber cloth or an old cotton T-shirt.
Wipe each lens gently in one direction. If there is stubborn dirt, slightly dampen the cloth with plain water, but do not spray liquid directly into the sensor and do not use harsh cleaners. Remove any cobwebs from the housing around the lens, since a web in front of the lens can block the beam even when the glass itself is clean.
After cleaning, watch the lights. Both should be steady. If they are, run the door through one cycle to confirm it closes normally. If a light is still blinking, move on to checking alignment and the path of the beam.
How to check alignment without tools
Alignment means the two sensors are pointing directly at each other. You can check it with your eyes. Stand to the side and look along the line between the sensors. Do they sit at the same height? Do the lenses face one another? Is one tilted up or down, or turned to the side?
If one sensor has shifted slightly, you can often see the difference by comparing the two. Most mounting brackets allow a small adjustment, usually with a wing nut or a thumb screw. Adjust the sensor in small steps, a little at a time, watching its light after each change. When the light turns steady, hold it there and tighten the bracket gently.
Take care not to force a bracket or to bend a sensor housing. If the bracket is cracked, if the track it is attached to is bent or if the sensor will not hold its position, stop. That is not a simple alignment problem, and the track and bracket are parts of the door, not just the sensor. Keep your hands clear of the track and the moving door at all times.
- Make sure the door is stopped and nobody is near it.
- Compare the height of the two sensors by eye.
- Look for a sensor tilted or turned away from its partner.
- Loosen the bracket nut slightly, adjust a little, and tighten again.
- Watch the indicator light and stop adjusting when it is steady.
- Stop if a bracket is cracked or a track is bent.
A simple test of the obstruction response
Once the lights are steady, you can test that the sensors do their job. Open the door fully. Place a light object, such as a roll of paper towels or an empty box, in the path of the beam, close to one of the sensors. Press the close button on the wall control.
A working system will not close the door, or it will begin to close and then stop and reverse. Some openers flash the lights or beep to show that the sensors have intervened. Remove the object and try again to confirm the door closes normally.
Do not test with your body, a pet or a child. The test is meant to be done with an object. If the door ignores the object and keeps closing, stop using the door and have it looked at. The broader set of checks, including how the door responds to contact, is explained in garage door safety tests you can do at home.
Why the door sometimes will not close from a remote
You may notice that a door refuses to close from a wall button or a remote while the sensors are blinking, or that it closes only when you hold down the wall button. This behavior depends on the opener. Many models allow a constant pressure close as a fallback, and the door moves only while you hold the button, usually with the opener lights flashing as a warning.
That fallback is meant to be temporary. If you find yourself using it often, the sensors are telling you they need attention. Treat it as a short term way to secure the door until the cause is found, not as a permanent fix. It also means that you must be present and watching the door as it closes.
A related issue is a remote that closes the door from a distance when the sensors are not working. Some openers refuse this, for good reason. If you cannot see the doorway while closing, you cannot know whether anything is in the way. The page on a door that will not close goes through the usual causes in more detail.
Weather, heat and the Florida environment
Sensors live in a harsh spot. They sit near the floor, where they are exposed to splashing rain, wet floors, sprinkler overspray and the constant humidity of a coastal climate. In summer, the garage can reach high temperatures that make plastic housings brittle and can degrade wires over time.
Insects are a recurring problem. Small spiders and ants are drawn to the warmth of the housing, and their webs and debris can interrupt the beam. A habit of wiping the lenses when you check the door is the simplest defense. Some homeowners also notice that condensation can form on a lens on humid mornings and clear itself as the day warms.
Storms add their own risk. A power surge can damage the sensors or the opener's board, and a water intrusion in the garage can reach a low mounted sensor. After a major storm or a flooding event, look at the sensors and their wires before you use the door, and have them checked if you see signs of water or corrosion.
Sensors, children and pets
Families sometimes ask whether the sensors are enough to keep children and pets safe. They are an important layer, but not the only one. A sensor can be out of line, blocked or disconnected without anyone noticing, and a small child can reach a point where the beam does not catch them.
Teach children that the door is not a toy and that the wall button and remotes are not playthings. Keep remotes out of reach of small children. Make it a habit to watch the door until it is fully closed, and to keep the area beneath it clear of toys and pet items.
For a broader look at household habits, see garage door safety for kids and pets. Think of the sensors as a good safeguard that works well alongside sensible house rules.
Common sensor problems at a glance
The table below summarizes the usual problems, what they look like and the safe first response. It is a guide for ordinary situations and does not replace the manual for your opener.
| What you see | Likely cause | Safe first response |
|---|---|---|
| One light blinking, one steady | Sensors out of line or beam blocked | Clear the path, clean lenses, check alignment by eye |
| Both lights dark | No power or wire problem | Check opener power and visible wire |
| Light flickers as the door moves | Loose or pinched wire | Look for pinched wire, then call if it persists |
| Works all day except at one hour | Direct sun on the receiver | Note the time and consider shading, per the manual |
| Door reverses for no reason | Dirty lens or small misalignment | Wipe lenses, check lights, look at brackets |
| Door closes only while the button is held | Sensors not seen by the opener | Use only while watching, then find the cause |
| Sensor hanging or loose | Broken or loosened bracket | Do not run the door until it is secured by a technician |
| Cobwebs or insects in the housing | Normal buildup | Clean gently with a dry cloth |
What not to do with sensors
Because sensors can be frustrating, some people look for a workaround. Taping over a lens, bridging the wires, disconnecting a sensor or mounting one higher so it stops triggering are all common ideas, and all of them defeat the very thing that protects people and property.
Disabling or bypassing a safety sensor removes a protection that the door is designed to have. It also may affect warranty or insurance questions, and it puts anyone who uses the garage at risk. If the sensors keep causing trouble, the answer is to find out why, not to turn them off.
Also avoid replacing sensors with parts from a different brand without checking compatibility. Sensors and openers are matched to each other by voltage and signal type, and a mismatched pair can fail to work or damage the board. A technician can confirm what fits your opener and install it correctly.
When it is time for a technician
A homeowner can clean, look, wipe and make a small, careful adjustment. Beyond that, it is time to ask for help. Signs that a sensor problem is bigger than it seems include lights that stay dark after the simple checks, a door that reverses even when the sensors look healthy, wires that are damaged or worn, brackets that are cracked or bent and any sign of water or burning near the sensors or the opener.
Sometimes the sensor is the visible symptom of something else. A door that is out of balance or binding in the track can trigger the opener's second protection, and the owner blames the sensors. A technician will look at the whole system, not just the part with the blinking light.
If you need help, safety sensor repair describes what is involved in general terms. Tell us what the lights are doing, when the trouble began and what you have already tried, and we will explain what we find and what the options are.
Questions and answers
They create an invisible beam across the doorway near the floor. If anything breaks the beam while the door is closing, the opener stops the door and sends it back up. This protects people, pets and vehicles from a heavy closing door. If the beam is blocked or misaligned, the opener may refuse to close. Keep notes of what you see so the next step is easier.
A blinking light usually means the beam is not reaching its partner. Something may be in the way, a lens may be dirty, or one sensor may have been nudged out of line. Clear the path, wipe both lenses with a soft dry cloth and compare how the two sensors are aimed. If it keeps blinking, ask for help.
A gentle wipe with a soft, dry cloth whenever you do your regular door check is plenty for most homes. In humid, coastal areas, dust, pollen and webs can build up sooner, so a monthly look is sensible. Always clean when the door is stopped and nobody is in its path. Keep notes of what you see so the next step is easier.
Many openers allow the door to close while you hold the wall button down, usually with the lights flashing. Use that only while you can see the doorway, and treat it as a temporary measure until the cause is found. Do not tape over, bypass or disconnect the sensors, since they protect people and property. Keep notes of what you see so the next step is easier.
A problem that comes and goes with the time of day often points to sunlight. Low sun shining directly into the receiver lens can overwhelm the beam for a short while. Note the time, check whether the receiver is in direct sun, and look in the manual for guidance. A technician can suggest a practical fix. Keep notes of what you see so the next step is easier.
Not always, but the two are matched to each other and to the opener. Often the pair is replaced together so that the sender and receiver work as a set. A technician can test the pair, check the wiring and explain whether a single part or both make sense for your particular opener. Keep notes of what you see so the next step is easier.
They are an important layer but not the only one. A sensor can be blocked, misaligned or disconnected without anyone noticing. Keep remotes away from small children, teach everyone that the door is not a toy, and watch the door until it is fully closed. Test the sensors regularly with an object, never with a person or a pet.